Residential Exterior Space Planning
Residential exterior space planning is the process of organizing the land around a house so that circulation, comfort, safety, climate response, privacy, technical services, and outdoor living functions work together as one coherent environment. While the building itself contains the interior life of the home, the exterior spaces determine how people arrive, move, relax, maintain the property, and interact with the surrounding neighborhood. A well-planned exterior environment improves usability, security, environmental performance, property value, and long-term maintenance efficiency. In professional practice, exterior planning is not treated as leftover design after the building is finished. It is part of the architectural concept from the beginning because setbacks, grading, vehicular movement, outdoor living, utility placement, drainage, and landscape structure all influence the position and form of the house itself.
Exterior planning always begins before detailed architectural drawings are finalized. It starts with understanding the site, continues through zoning the outdoor areas, and develops into circulation systems, climate control strategies, drainage logic, planting structure, and service placement. Designers who master exterior space planning produce residential layouts that feel intentional rather than accidental. They also reduce many of the problems that later appear on site, such as water ponding at doors, badly positioned septic systems, difficult parking maneuvers, unusable side yards, poor privacy, unsafe level changes, and planting that later damages foundations or underground infrastructure.
Understanding the Site Before Planning Exterior Spaces
Every successful exterior layout begins with a clear reading of the land. Before positioning terraces, parking, or gardens, the designer must interpret physical and environmental conditions that will influence every later decision. The first elements to analyze are the plot dimensions and geometry. Rectangular plots allow straightforward zoning and circulation alignment, while irregular plots require more strategic placement of access routes and open spaces. Narrow plots often favor linear circulation along one side of the house, whereas wider plots allow symmetrical entry arrangements or courtyard strategies. The designer should also read the shape of the buildable area, not just the total plot size, because setbacks, utility easements, septic reserve areas, drainage channels, and turning needs may significantly reduce the truly usable exterior ground.
Equally important are boundaries and setbacks. Local planning regulations define minimum distances between buildings and property edges, but beyond regulation, good practice also protects ventilation, maintenance access, daylight, drainage swales, privacy planting, and fire separation. In many residential layouts, side yards narrower than about 1.2 m quickly become difficult to maintain, while widths of 1.5 m to 2.4 m begin to function better for service movement, drainage work, boundary-wall maintenance, and screened planting. Front setbacks often need to absorb gate swing, parking apron depth, pedestrian transition, and visual presentation. Rear setbacks often become technically valuable because they can accommodate private outdoor living, drying yards, rainwater soak zones, or septic-related clearances where permitted.

Slope is another decisive factor. A flat site allows flexible arrangement of outdoor functions, while a sloped site encourages stepped terraces, retaining walls, ramps, and split-level circulation. Instead of forcing the terrain into one flat platform, skilled designers often adapt the layout to the natural topography to reduce excavation cost and improve drainage performance. In practice, mild grades may be absorbed through landscape shaping, but once level differences become visually or physically significant, the designer must coordinate retaining elements, drainage interception, safe stair geometry, accessible routes, and soil erosion control together. Walkways intended for comfortable general use are best kept gentle, and where a route is intended to be accessible without being classified as a ramp, the running slope should generally remain at or below about 5%; steeper routes begin demanding ramp logic, landings, edge protection, and more careful detailing.
The orientation of the plot relative to the public road also determines where the main entrance, driveway, and pedestrian approach should be located. Understanding neighboring buildings helps prevent overlooking conflicts and supports privacy planning. The designer should also analyze where noise comes from, where useful views exist, how stormwater naturally leaves or enters the site, and where underground conditions may affect soakaway performance or septic feasibility. A proper site reading is already the beginning of design.
The Legal Box and the Real Site
The first mistake beginners make is drawing the house first. The correct first step is to draw the “legal box” that the building must fit inside. Start with the property boundary (the legal line that defines your land). This is not the fence; it is the legal geometry recorded on a survey. If you build beyond it, even by 10 cm, it can become a demolition issue later. On your drawing, the property boundary is always the strongest line because it is law.
Once the boundary is drawn, you apply setbacks. A setback is a required empty distance between the boundary and the building. Setbacks exist for safety, ventilation, fire separation, and access. Typical residential setbacks in many urban West African contexts often fall around front 3–7 m, side 1.5–4 m, rear 1.5–4m, but you must always respect your local rules. After you draw those setback lines, what remains inside becomes the buildable envelope, meaning the shape inside which the building is legally allowed to sit (balconies, terraces, overhangs included). Treat the buildable envelope like a tray: if the building does not fit inside the tray, it is not a valid design.
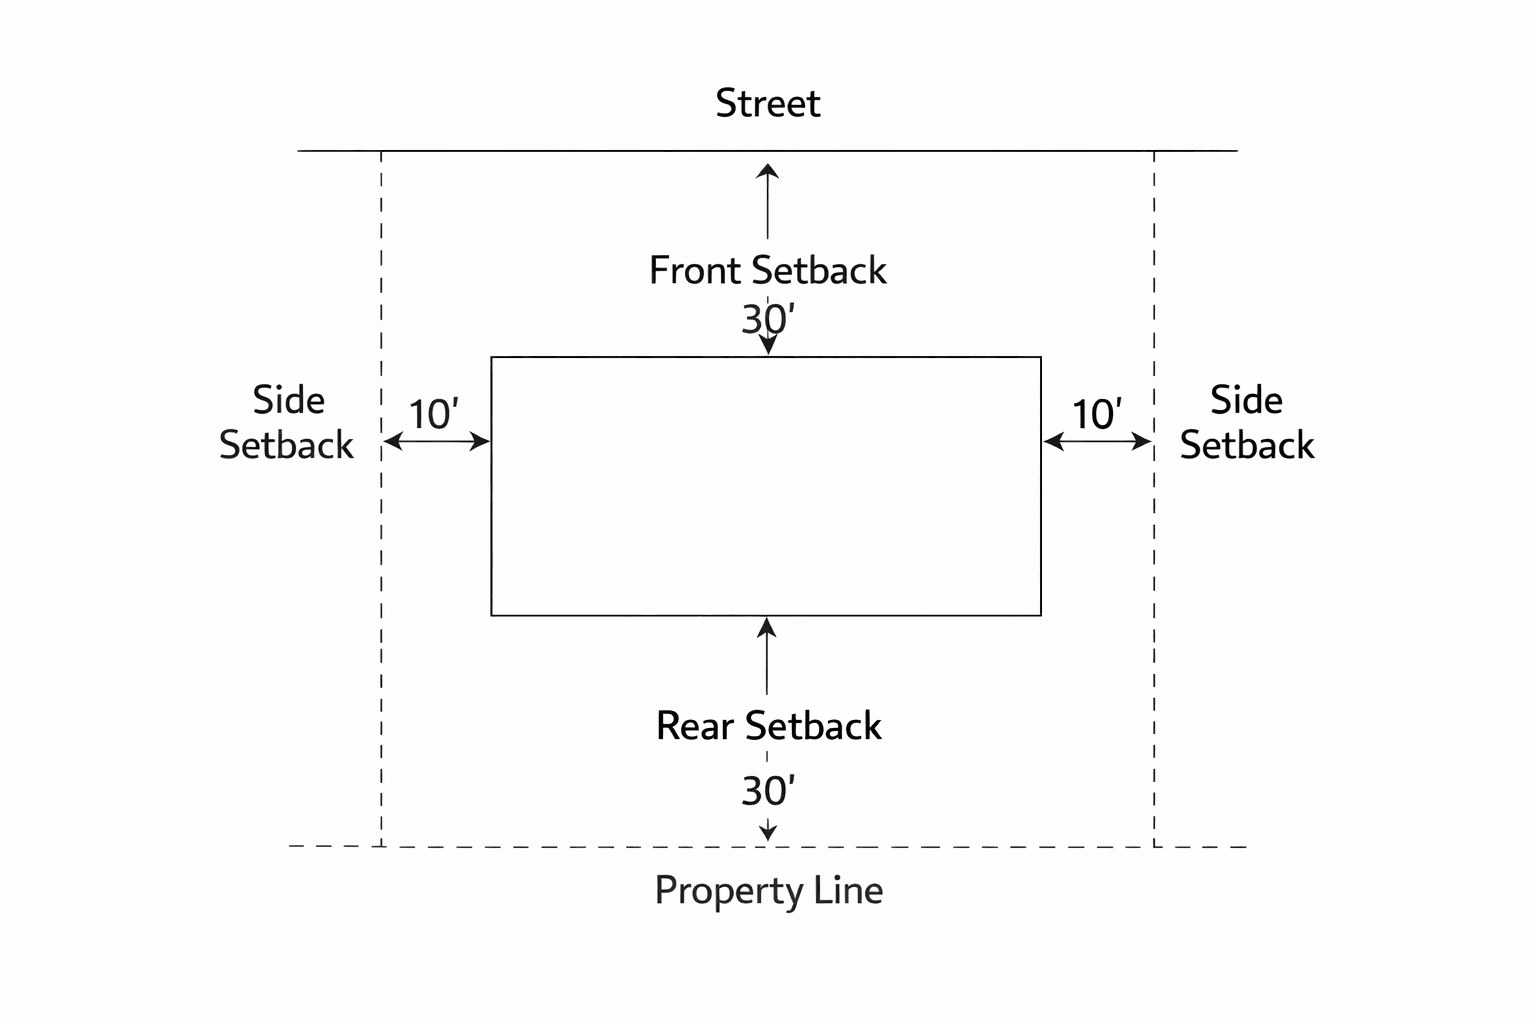
To make this real, take a narrow plot example: 10 m × 20 m (long). If side setbacks are 1.5 m each, your envelope width becomes 10 − 3 = 7 m. If front setback is 6 m and rear setback 3 m, your envelope depth becomes 20 − 9 = 11 m. That envelope is the real canvas. Everything outside it must become your arrival, parking, walkways, outdoor living, and services.
The Three Primary Exterior Zones Around a House
Most residential exterior layouts can be organized into three major functional zones: the arrival zone, the leisure zone, and the service zone. These zones should be clearly defined but visually connected through circulation and landscape design. When these zones are mixed carelessly, the result is often confusion: cars dominate sitting areas, laundry appears in the formal approach, generators disturb terraces, or visitors pass through private family zones before reaching the entrance. Good planning assigns each zone a role, then ensures that the transitions between them remain logical and dignified.
The Arrival Zone
The arrival zone creates the first architectural impression of the property. It includes the entrance gate, driveway, pedestrian walkway, parking space, entrance platform, and sometimes a small landscaped forecourt. This zone must balance functionality with representation because it communicates the identity of the home to visitors. It must also work in bad weather, at night, and during peak activity such as arrivals with groceries, deliveries, visitors, and school drop-off. Designers should therefore think beyond “where the car enters” and consider visibility, turning behavior, reversing safety, lighting, threshold weather protection, step-free movement, and the relationship between gate, porch, and front door.

Driveway widths depend on whether circulation is single-lane or double-lane. A practical single-lane driveway is often 3.0 m to 3.6 m wide, while two-way movement usually needs about 5.5 m to 6.0 m. Where walls, columns, or tight gate piers flank the entrance, designers should be generous because psychological narrowing makes a driveway feel smaller than its measured width. Short residential internal drives should also be checked for slope. For comfortable daily use, especially where low-clearance vehicles are common, many designers try to keep the main driveway gradient around 8% to 12% or less, and transitions at the top and bottom should be smoothed to reduce vehicle scraping. Surface crossfall for drainage is often around 1.5% to 2%, enough to remove water without creating awkward tilting for pedestrians or parked cars.
Parking dimensions should allow both vehicle clearance and pedestrian movement. A standard residential parking bay typically measures around 2.4 m to 2.7 m in width and 4.8 m to 5.5 m in length, but larger SUVs and pick-ups often justify using the upper end of that range or more. If one resident or visitor may have reduced mobility, the designer should think beyond an ordinary bay. In widely used accessibility practice, a car-accessible space is at least 96 inches wide with an adjacent 60-inch access aisle, while van-accessible arrangements require either a 132-inch bay with a 60-inch aisle or a 96-inch bay with a 96-inch aisle, and these surfaces should remain nearly level, with slope not exceeding about 1:48 (2.08%) in any direction. Even where such standards are not legally mandatory for a private home, they provide excellent design guidance for inclusive residential planning.

Pedestrian entry paths leading from the gate to the house entrance should remain visually clear and accessible. A width of 1.2 m minimum allows comfortable single movement, while 1.5 m to 1.8 m supports two people walking side by side. On accessible routes, a continuous clear width of 36 inches is commonly used as the minimum benchmark, with short pinch points allowed down to 32 inches for limited distances, though broader paths feel better and are more future-proof. The surface should be firm, stable, slip-resistant, and free from abrupt level changes. Changes in level greater than about ½ inch should be beveled or ramped, because even small unevenness can become dangerous for older users, children, and wheeled movement.

Entrance steps or ramps must connect smoothly to the finished floor level. Where accessibility is required, ramps should follow slopes close to 1:12 (8.33%), with intermediate landings and proper maneuvering space at doors. A route that is theoretically compliant but exhausting to use is not good design. On real residential sites, designers should try to minimize the need for long ramps by adjusting finished levels intelligently, using gentle grading where possible, and locating the most inclusive approach on the easiest side of the site.
The Leisure Zone
The leisure zone is the private outdoor extension of the house. It usually includes terraces, patios, gardens, children’s play areas, outdoor dining spaces, and optional features such as swimming pools or barbecue corners. Unlike the arrival zone, which is semi-public, the leisure zone should feel protected and comfortable. The best leisure spaces do not simply occupy whatever land remains behind the house. They are positioned intentionally in relation to sun path, shade opportunities, prevailing breeze, view direction, privacy screening, noise sources, and kitchen or family-room access. A leisure space that is too exposed, too hot, too far from indoor living, or visually overlooked will not be used as much as its size may suggest.
Terrace dimensions depend on intended use. A compact sitting terrace may begin around 3 m × 3 m, an outdoor dining terrace may need around 3 m × 4.5 m, and a family gathering terrace often works better at 4 m × 6 m or larger. But dimensions alone are not enough. The designer must account for furniture pull-out, circulation around tables, service access for food movement, and the depth of shade if a pergola or roof overhang is planned. Many outdoor terraces fail because they are sized exactly for furniture but not for people moving around that furniture. Good practice leaves at least 900 mm to 1200 mm of circulation where people must walk behind chairs or around edges, and more where service trays, children, or wheelchair movement may occur.

Swimming pools, when included, should maintain safe clearance distances from buildings, boundary walls, and service zones. Residential pools often range roughly from 2.5 m to 5 m in width and 6 m to 12 m in length, but the real planning issue is not only the water rectangle. A pool needs a functional pool deck, maintenance access, equipment location, drainage strategy, anti-slip paving, supervision visibility, and a compliant safety barrier where required. Widely used pool safety requirements call for barriers at least 48 inches high measured on the outside, with gates opening away from the pool and being self-closing and self-latching. Even in places where a private residence is not strictly inspected to those exact standards, they represent sound life-safety practice and should heavily inform design. The deck itself should not pond water, and anti-slip finishes are essential because the pool zone combines wet feet, running children, and hard surfaces.

A leisure zone should usually be on the quieter and more private side of the property, away from direct street exposure. In warm climates, designers often place major outdoor living where it is protected from low east or west sun and can catch prevailing breezes. If the site does not naturally offer this, the solution may come from pergolas, trees, canopy depth, wall positioning, or even rethinking where the house sits on the plot. Exterior space planning is therefore inseparable from massing and orientation.
The Service Zone
The service zone contains technical and maintenance-related functions that support daily household operations but should remain visually discreet. Typical elements include clothes drying areas, waste collection points, generator placement, outdoor sinks, gas storage areas, water tanks, and sometimes staff access paths. This zone is often the most neglected part of residential site planning, yet it strongly affects daily convenience and the perceived order of the whole property. If badly planned, technical items spill into the arrival zone or private garden, noise affects outdoor living, gas and refuse create safety or odor problems, and service movement crosses formal entrances.

Clothes drying yards commonly need at least 1.5 m of width to function, though 2 m to 3 m feels better where users stand, bend, sort, and move around lines. Waste bin areas should be easy to clean and ventilated, but screened from direct view and sunlight where possible. Outdoor washing points should not discharge water toward foundations or footpaths. Gas cylinder zones should be ventilated, shaded, protected from vehicle impact, and kept clear of ignition sources. The service yard should ideally connect directly to the kitchen, utility room, or back entrance without forcing users through the main terrace or visitor approach. This is one of the clearest marks of mature residential planning.
Generator placement deserves much deeper attention than it usually receives. In residential work, the generator pad should be stable, above obvious ponding zones, accessible for servicing, and far enough from windows, doors, and outdoor sitting areas to limit noise, heat, fumes, and maintenance conflicts. Manufacturer guidance for home standby units commonly requires around 5 ft of clearance above, and about 3 ft at the front and both ends from vegetation or obstructions, while fire-safety guidance often uses 5 ft as an important separation benchmark from combustible walls or openings unless a tested assembly allows less. In design terms, this means the generator should not simply be pushed into a random side yard. It should sit on a planned pad with drainage fall, servicing space, acoustic consideration, and a route for fuel and electrical connection that does not damage the rest of the landscape.
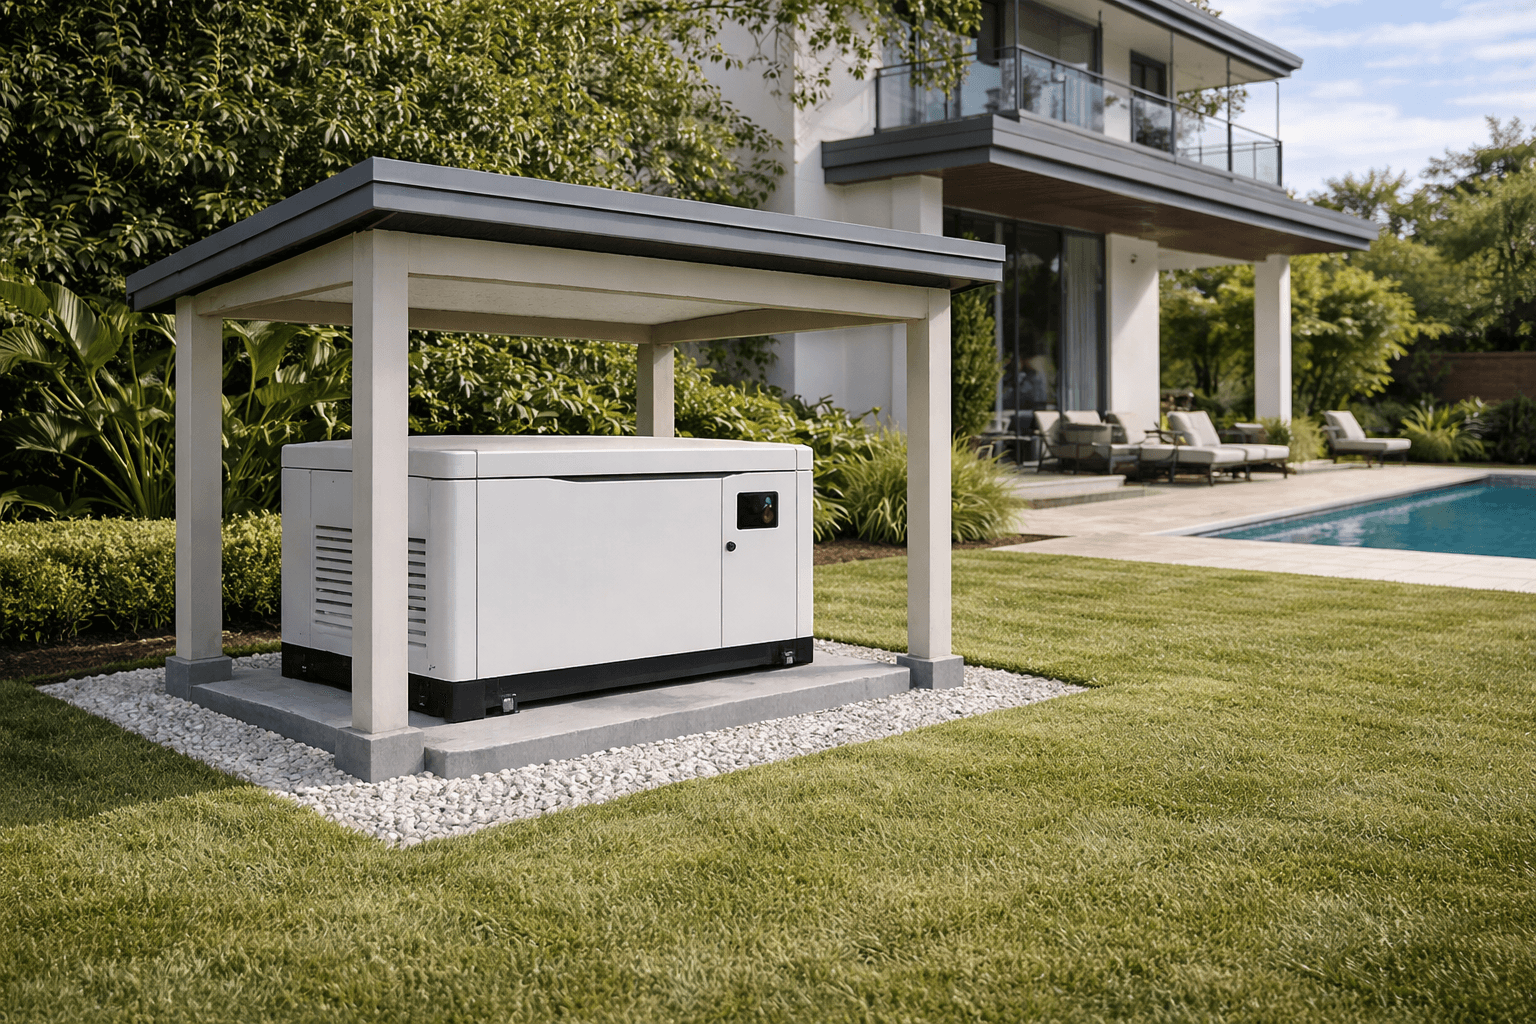
The pad (also called plinth) on which sits a generator is a concrete platform that keeps it off wet ground and reduces vibration. A practical residential generator plinth might occupy roughly 1.5–2.0 m wide × 2.5–3.0 m long, depending on the generator size.
Exterior Circulation Planning
Circulation connects all exterior zones into a functional system. It includes pedestrian movement, vehicle movement, accessibility routes, and service access. A site may have generous total area but still function poorly if circulation is awkward. Exterior circulation should therefore be read almost like a plan of invisible lines: who comes from the street, where they first step, where they turn, how they reach the entrance, where deliveries go, how refuse leaves, how cars reverse or loop, how a child moves to a play zone, how maintenance reaches the generator or septic area, and how someone with temporary or permanent mobility limitation can enter with dignity.
Pedestrian paths should remain continuous, safe, and well-defined. A minimum of about 0.9 m may work for a secondary service path, 1.2 m is a sound standard path, and 1.5 m to 1.8 m provides much greater comfort. If a route is meant to be inclusive, keep the cross slope controlled, because accessibility guidance generally limits cross slope to 1:48 maximum. Where turns occur around tight obstructions, more space is needed than on a straight path. In practice, this means narrow side passages should not suddenly become turning points near doors or gates unless widened locally. Designers should also leave planting and walls back from the clear walking zone; buffers of even 300 mm to 900 mm help keep the usable walking width from being lost to shrubs, rough walls, and downpipes.

Vehicle turning geometry must be checked early, not guessed at the end. Many residential compounds waste space because the driveway is wide enough but the turning head is not. Depending on vehicle type, a practical residential turning radius often falls around 5.5 m to 7.5 m, but local vehicle mix matters. The design should also consider whether the user enters front-first and exits reversing, or vice versa. On constrained sites, it is usually better to solve this with geometry from the start than to rely on drivers “managing somehow” later.
Accessible design principles require more than ramps. They require a coherent route from the point of arrival to the entrance, with firm surface, limited slope, adequate width, proper landing at doors, and no hidden obstacles. The best residential solution is often not a separate “disabled route” but one primary route that is naturally gentle, direct, and dignified for everyone.
Privacy, Views, Noise Control, and Spatial Comfort
Exterior space planning must carefully manage visual exposure between the house and its surroundings. Front yards are usually more open and formal because they address the public street, while backyards function as private family environments. But privacy is not achieved only by erecting a tall wall. It comes from a whole set of design moves: window positioning, level differences, terrace orientation, tree canopy, pergola filtering, hedge thickness, lattice screens, and the sequence through which one space reveals another. A well-planned exterior layout allows the front to remain welcoming while the family areas remain protected.
Boundary walls, hedges, pergolas, and screens can all support privacy. Walls in the range of about 1.8 m to 2.4 m are common for strong enclosure, while hedges between roughly 1.2 m and 2 m can soften boundaries and reduce glare. Pergolas and vertical screens around 2 m to 2.7 m high can create privacy without fully blocking light and air. On small plots, designers should remember that an overbuilt boundary can reduce airflow and make exterior areas feel oppressive. In warm regions, filtered privacy is often better than sealed privacy.

Noise control is especially important on plots facing busy roads. A layered strategy works better than one single element. Setback distance, solid walling, a planted buffer, and careful placement of terraces away from the noise source often outperform any one of those measures used alone. A planting strip of roughly 1.5 m to 3 m can already improve both sound perception and visual comfort if combined with dense planting and a solid boundary. More importantly, the designer should avoid placing the most sensitive leisure spaces where noise impact is greatest unless the site leaves no alternative.
Climate-Sensitive Exterior Planning in Warm Regions
In warm tropical climates such as Ghana, solar orientation strongly influences outdoor comfort. East and west exposures are difficult because the sun is lower and harsher, producing glare and heat that are harder to block than high overhead sun. For this reason, terraces, play corners, and sitting areas often perform better when placed where they can be protected by the building itself, deeper overhangs, pergolas, trees, or secondary walls. A designer should not think only in terms of “north, south, east, west” as abstract directions, but in terms of morning glare, late afternoon heat, reflected heat from paving, breeze entry, and shade duration during actual hours of use.

Effective shading strategies include roof overhangs of roughly 0.9 m to 1.8 m, pergola projections around 1.5 m to 3 m, and trees placed far enough from the building to provide canopy shade without root damage. If the terrace is intended for dining, the designer should ask what time the family is likely to use it. A space that is beautiful at noon may be unbearable at 4:00 p.m. if west glare is not controlled. Where breezes are available, align openings between masses, side courts, pergolas, and planting so that air movement is encouraged rather than blocked. In hot climates, a shaded breezy terrace can feel dramatically cooler than one of identical size and finish placed without climate logic.
Drainage and Grading Design Around the House
Drainage planning ensures that rainwater flows safely away from the building instead of accumulating near foundations or entrances. Poor drainage is one of the most common causes of residential exterior failure. It can lead to damp walls, stained plinths, foundation distress, slippery pavements, mosquito breeding, landscape erosion, septic overload, and unusable compound areas. Exterior planning must therefore treat water as a design force, not an afterthought.
For paved exterior surfaces, slopes around 1.5% to 2% are standard good practice, enough to keep water moving without making walking uncomfortable. Walkways and parking surfaces should be designed so that water does not pond and does not sheet aggressively across the path of travel. On routes intended to be accessible, cross slope should remain within the accessible limit of about 1:48, so drainage has to be resolved carefully without over-tilting the surface. This is one reason why detailed spot levels matter so much in exterior work.

Ground immediately around the building should fall away from the foundation. A widely used benchmark is a fall of at least 6 inches within the first 10 feet, which is about 150 mm over 3 m, or roughly 5%. This is stronger than the flatter drainage slopes used across open paving, and its purpose is to pull water away from the building edge quickly before it can soak near the wall base. Where the site is too constrained to achieve this naturally, the designer may need swales, slot drains, gravel drainage bands, or local retaining solutions. Finished external ground should also sit below the interior floor level; a commonly used practical minimum is around 150 mm lower, though more (300 mm to 600 mm) may be wise in intense rainfall areas.
Surface water should be directed toward suitable discharge points such as channels, catch basins, soakaways, infiltration zones, or street drains where permitted. But simply “sending water away” is not enough. The designer must ask where it goes after that. If a downpipe discharges near a septic field, if a soakaway is too close to foundations, if a channel outfall erodes a neighbor’s boundary, or if water from the driveway crosses the accessible path, then the drainage design has not truly been solved. In sustainable residential planning, permeable surfaces, infiltration trenches, rain gardens, and planted swales can reduce runoff pressure when soil and maintenance conditions allow. Permeable paving commonly performs best on gentler slopes, with many design references preferring surface slopes below about 5% and flatter subgrade conditions where infiltration is intended.
Septic Tanks, Soakaways, and Onsite Wastewater Planning
Residential exterior planning becomes truly professional when wastewater systems are planned intelligently. Septic tanks, soakaways, leach fields, and reserve treatment areas are not secondary matters. They are major site-planning determinants because they affect health, groundwater protection, landscape use, building placement, and future maintenance access. In many jurisdictions, single-family septic systems are regulated locally rather than federally, but the common engineering principles are consistent: the soil must be suitable, setbacks must be respected, and wastewater treatment must be kept away from wells, foundations, driveways, and sensitive water bodies.
A septic tank is a buried watertight chamber where solids settle and floating scum separates before partially treated effluent moves to a drainfield or other approved disposal system. The drainfield is typically a shallow, covered soil absorption area. If the drainfield is overloaded with liquid or clogged with solids, sewage can surface in the yard or back up into the house. That is why designers must not treat the septic system as merely “a pit somewhere at the back.” It needs soil assessment, hydraulic thinking, maintenance access, and protection from surface-water overload. Roof water, driveway runoff, and terrace wash-down should never be directed into the septic treatment area.
Sizing varies significantly with local design method, soil type, and occupancy assumptions, but wastewater design commonly uses the number of bedrooms as a flow basis. EPA (Environmental Protection Agency) technical guidance notes typical residential design flows of up to about 150 gallons per day per bedroom in some system types. For a three-bedroom home, the required leaching-chamber drainfield area can vary enormously with soil texture, from about 200 square feet in coarse-textured soil to about 2,000 square feet in fine-textured soil. This huge range teaches an important lesson: soil conditions, not just household size, control land demand for onsite wastewater disposal.
Setback distances for septic systems vary by local rules, but the principles are universal. Treatment areas should be separated from buildings, property lines, wells, and surface waters. Contamination risk is lower when a well is farther from the septic system, deeper, and not downgradient of it; the risk is higher when soils are permeable, the well is shallow, groundwater flows from the septic system toward the well, or the tank and field are poorly maintained. In practical site planning, this means the designer should always think about slope direction, groundwater flow direction, well location, future access for desludging trucks, and the reserve area that may be needed if the first disposal field fails later.
Large trees should not be planted close to septic tanks, soakaways, or leach fields because roots can invade joints, clog distribution lines, and disturb soil treatment performance. Heavy vehicular traffic should also be kept off drainfields and many soakaway zones because compaction reduces soil infiltration and can damage buried elements. This is why good residential layout often places the service zone and septic zone in related but distinct parts of the site, ensuring that maintenance can occur without crossing major leisure spaces.
Vegetation Planning and Landscape Structure
Vegetation plays both environmental and spatial roles in exterior planning. Trees provide shade, shrubs define boundaries, and groundcovers stabilize soil. But good planting design is not decoration only. It is part of microclimate design, privacy control, erosion control, dust reduction, and visual hierarchy. Trees can cool a terrace, protect a west wall, or make a front court feel established. Shrubs can screen a service yard or soften a wall. Groundcovers can reduce mud in rainy seasons and dust in dry seasons.

Recommended planting distances depend on plant size and root behavior, but as a practical guide, small trees may begin around 3 m from foundations, medium trees around 5 m, and large trees around 6 m to 10 m or more depending on species. Those clearances become even more important near septic tanks, soakaways, retaining walls, underground water lines, and boundary footings. Designers should also allow maintenance space between dense planting and walls so that dampness, hidden pests, and inaccessible repairs do not become chronic problems.
Exterior Safety and Security Planning
Safety considerations must be integrated into all exterior layouts. Level changes, slippery finishes, poorly lit corners, badly drained paving, unsafe pool access, and hidden service equipment all create avoidable hazards. Level differences greater than about 600 mm should generally be protected with guardrails or protective walls, and barrier heights commonly fall around 900 mm to 1100 mm for guarding situations. Stair edges should be visually legible, ramps should have edge protection where needed, and surfaces exposed to water should be selected for slip resistance.

Lighting is one of the most underestimated safety tools in residential exterior planning. Good lighting should support the gate, entry path, porch, parking area, level changes, and service movement without excessive glare. The objective is not to flood the entire site with harsh light, but to reveal routes, obstacles, edges, locks, and faces clearly enough for safe movement and security recognition. In professional design, lighting is coordinated with planting so that shrubs do not later block fixtures or create hidden shadow pockets.

Security comes from well-designed gates, controlled access points, visibility, boundary treatment, and lighting. A secure house is not necessarily the one with the heaviest walls; it is the one where entry is legible, approaches are observable, hidden ambush corners are minimized, and service functions are not left exposed to tampering. Pool barriers and self-latching gates are especially important where children may be present.
Material Selection for Exterior Spaces
Exterior materials must withstand weather exposure, foot traffic, and long-term maintenance conditions. Common paving materials include concrete paving slabs, interlocking blocks, natural stone, textured screed finishes, and stabilized gravel. The designer should think about more than appearance. The surface should remain safe when wet, tolerable under direct sun, repairable when underground work occurs, and suitable for the expected loading. A driveway requires very different structural preparation from a garden path. A pool deck requires different slip performance from a forecourt. A service yard may need finishes that tolerate detergent, grease, or constant washing.

Material transitions should also be intentional. They can help users read the site: rougher paving for service, finer paving for arrival, warmer textures for leisure, tactile warning or contrast at steps, and drainage-compatible finishes where runoff is expected. Good residential site design uses material changes to reinforce zoning without making the compound visually chaotic.
Integrating All Exterior Elements Into a Coherent Layout
Successful exterior space planning is not achieved by placing elements independently. It results from combining zoning, circulation, privacy, climate response, drainage, wastewater strategy, vegetation, safety, and materials into one integrated system. This is what separates a casual site arrangement from professional residential planning. When the arrival zone welcomes visitors clearly, the leisure zone supports family life comfortably, the service zone functions efficiently, circulation remains logical, shading improves comfort, drainage protects the building, septic and utility systems are properly sited, and planting strengthens spatial quality, the exterior environment becomes an essential extension of the house rather than leftover space around it.
Architectural designers and drafters who master residential exterior space planning produce layouts that are functional, climate-responsive, secure, and visually balanced. They also produce projects that age better, because future maintenance, adaptation, and daily living have already been considered in the original design. That is one of the clearest differences between beginner-level site planning and mature professional work. Exterior planning is not just where things are placed. It is how land, architecture, climate, water, movement, and domestic life are composed into one living environment.